刚学会用Vue框架,由于我有点前端基础,在没有接触Vue等框架的之前,都是纯手写的html静态页面
但我当时已经接触了很多关于Node的很多用法,以及了解npm、webpack等(全是拜Hexo所赐)
所有在学习Vue的时候不是用<script></script>标签引入的,直接就使用Vue CLI构建,直接学习
学习的时候一直用的是Vue CLI构建构建项目,在build时我不想让Vue CLI打包成好几个js文件,当时也上网查了很多资料
视乎Vue CLI并不允许这样做,但是也有很多大神提供了很多办法,奈何我看不懂,只能手动搭建vue+webpack环境
创建项目目录D:\Vue3_Webpack5
1
2
3
| cd ./Vue3_Webpack5
npm init -y
npm install webpack webpack-cli --save-dev
|
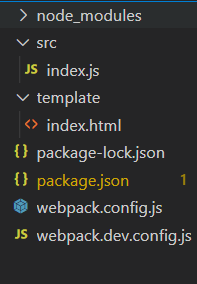
在根目录创建webpack.config.js–webpack.dev.config.js–template/index.html–src/index.js如下图

我个人不喜欢使用webpack的配置文件合并功能,我更喜欢新建指定文件让webpack去执行
虽然这种办法会出现很多冗余代码,但是这样能更清晰明了的读懂代码
修改webpack.config.js和webpack.dev.config.js
1
2
3
4
5
6
7
8
9
10
|
const path = require('path')
module.exports = {
mode: "production",
entry: path.join(__dirname, './src/index.js'),
output: {
path: path.join(__dirname, 'dist'),
filename: '[name].js'
}
}
|
1
2
3
4
5
6
7
8
9
10
|
const path = require('path')
module.exports = {
mode: "development",
entry: path.join(__dirname, './src/index.js'),
output: {
path: path.join(__dirname, 'dist'),
filename: '[name].js'
}
}
|
修改package.json的script
1
2
3
4
| "scripts": {
"bulid": "webpack --config ./webpack.config.js",
"dev": "webpack serve --config ./webpack.dev.config.js"
},
|
安装html-webpack-plugin webpack-dev-server插件,就不用每次写完代码后要重新打包运行了
执行npm install html-webpack-plugin webpack-dev-server -D
由于html-webpack-plugin插件在默认情况下会自动注入打包好的js
并且添加的位置是</head>之前,拥有defer属性
可是我想让js导入的位置是</body>之前我该怎么做?
给webpack里的new HtmlWebpackPlugin()添加inject: false
修改webpack.dev.config.js和webpack.config.js
1
2
3
4
5
6
7
8
9
10
11
12
13
14
15
16
17
18
19
20
21
22
23
24
25
26
27
28
29
|
const path = require('path')
const HtmlWebpackPlugin = require('html-webpack-plugin')
module.exports = {
mode: "development",
entry: path.join(__dirname, './src/index.js'),
output: {
path: path.join(__dirname, 'dist'),
filename: '[name].js'
},
plugins: [
new HtmlWebpackPlugin({
template: path.join(__dirname, './template/index.html'),
filename: 'index.html',
title: '手动建搭 Vue 开发环境',
inject: false
})
],
devServer: {
contentBase: path.join(__dirname, './dist'),
port: 1104,
publicPath: '/',
hot: true,
open: true,
compress: true
}
}
|
修改template/index.html
1
2
3
4
5
6
7
8
9
10
11
12
13
| <!DOCTYPE html>
<html lang="zh-CN">
<head>
<meta charset="UTF-8">
<meta http-equiv="X-UA-Compatible" content="IE=edge">
<meta name="viewport" content="width=device-width, initial-scale=1.0">
<title><%= htmlWebpackPlugin.options.title %></title>
</head>
<body>
<div id="app"></div>
<script src="./main.js"></script>
</body>
</html>
|
安装Vue3 npm install vue@next --save注意必须使用@next,如果不使用,则安装的是vue2的最新版本而不是vue3
安装完成后创建/scr/App.vue
1
2
3
4
5
6
7
8
9
10
11
12
13
14
15
16
17
18
19
20
21
22
23
| <template>
<div class="lete">
<span>这里是乐特博客:</span>
<a :href="blog" target="_blank">{{ blog }}</a>
</div>
</template>
<script>
export default {
components: {},
data() {
return {
blog: "https://blog.lete114.top",
};
},
};
</script>
<style scoped>
.lete {
color: #00c4b6;
}
</style>
|
修改src/index.js
1
2
3
4
5
6
7
|
import { createApp } from 'vue'
import App from './App.vue'
const app = createApp(App)
app.mount('#app')
|
到这里先别急着运行代码,我们还得安装load
需要安装两个插件
- vue-loader
它是基于 webpack 的一个的 loader 插件,解析和转换 .vue 文件 - @vue/compiler-sfc
在这里提醒一下,我之前搭建的时候看的是vue-loader官网的教程,里面说要安装vue-template-compiler插件,我安装后运行报错,我以为我哪个步骤出现了问题,排查了好几遍都没发现啥毛病,最后删了重来还是报错(崩溃,浪费了好多时间),最后我翻开了之前用Vue CLI构建的项目,发现Vue3用的是@vue/compiler-sfc而不是官网说的vue-template-compiler,害我折腾了好久,更气人的是,官网并没有说明是vue2的教程(可能官方推荐使用vue3的时候用cli构建吧)
安装插件npm install vue-loader@next @vue/compiler-sfc -D
安装vue3要用@next安装load当然也要,否则安装的就是vue2的load了
慢着,还需要两个插件style-loader和css-loader处理vue的css样式
npm install style-loader css-loader -D
修改webpack.dev.config.js和webpack.config.js
1
2
3
4
5
6
7
8
9
10
11
12
13
14
15
16
17
18
19
20
21
22
23
24
25
26
27
28
29
30
31
32
33
34
35
36
37
38
39
40
41
|
const path = require('path')
const HtmlWebpackPlugin = require('html-webpack-plugin')
const { VueLoaderPlugin } = require('vue-loader')
module.exports = {
mode: "development",
entry: path.join(__dirname, './src/index.js'),
output: {
path: path.join(__dirname, 'dist'),
filename: '[name].js'
},
module: {
rules: [
{
test: /\.vue$/,
use: ['vue-loader']
}, {
test: /\.css$/,
use: ['style-loader', 'css-loader']
}
],
},
plugins: [
new HtmlWebpackPlugin({
template: path.join(__dirname, './template/index.html'),
filename: 'index.html',
title: '手动建搭 Vue 开发环境',
inject: false
}),
new VueLoaderPlugin()
],
devServer: {
contentBase: path.join(__dirname, './dist'),
port: 1104,
publicPath: '/',
hot: true,
open: true,
compress: true
}
}
|
安装clean-webpack-plugin插件,每次build代码的时候都会清除dist目录,避免上一次build遗留下来的文件
修改webpack.config.js
1
2
3
4
5
6
7
8
9
10
11
12
13
14
15
16
17
18
19
20
21
22
23
24
25
26
27
28
|
const path = require('path')
const { VueLoaderPlugin } = require('vue-loader')
const {CleanWebpackPlugin} = require('clean-webpack-plugin')
module.exports = {
mode: "production",
entry: path.join(__dirname, './src/index.js'),
output: {
path: path.join(__dirname, 'dist'),
filename: '[name].js'
},
module: {
rules: [
{
test: /\.vue$/,
use: ['vue-loader']
}, {
test: /\.css$/,
use: ['style-loader', 'css-loader']
}
],
},
plugins: [
new VueLoaderPlugin(),
new CleanWebpackPlugin()
]
}
|
安装babel插件让我们写的代码在build的时候兼容指定浏览器的版本号
npm install @babel/core @babel/preset-env babel-loader
在根目录下新建babel.config.js
1
2
3
4
5
6
7
8
9
| module.exports = {
presets: [
["@babel/preset-env", {
"targets": {
"browsers": ["last 2 versions"]
}
}]
]
}
|
在webpack.config.js中的module新增
1
2
3
4
5
6
7
8
9
10
11
| module: {
rules: [
{
test: /\.js$/,
exclude: /node_modules/,
loader: 'babel-loader'
},
]
}
|
自己要分清楚,有些插件是在开发时需要,而有些在build时不需要,如果你觉得都一样,也可以只写一个webpack.config.js把全部配置全部塞进去
比如clean-webpack-plugin在dev时根本就没啥用,同理在build的时候webpack-dev-server也是没用的,在build的时候也可以不用html-webpack-plugin